What a surprise today! I took my old dog for a walk up the hill and off the beaten track, not far from home, with my camera, just in case. I have only ever seen the little blue faerie parasoles – Mycena interupta, deep down in moist valleys were the sun doesn’t much reach, beside streams usually on wet, rotting Silver Wattle branches.
This beautiful little family on a fallen Eucalypt branch was no where near a stream! It was on a south slope in moderately heavy bush, nearly at the the top of the hill and in full sun for at least part of the day!

The shot above from the Olympus EM1 Mark 2 is my usual 15 shot in-camera focus stacked image edited slightly in Photoshop.
I took a few shots at different exposures to get the best out of the brilliant blue. Below, I have combined three of the stacked jpeg images (including the one above) to create a “High Dynamic Range” image.
In Photoshop, I “merged them to HDR Pro”, wiggled a few sliders until I was creatively happy – resulting in a pretty flat and under-saturated shot that included as much detail as I could squeeze out of it. Then opened it in Photoshop, adjusted the levels, increased the vibrance, lowered the saturation again slightly and cropped it.

My aim was not to make this look like it looked, but to show as much detail as I could in the shadows and highlights and bring out the beautiful blue.
Lastly … another edit method – the most time consuming, but the best result!

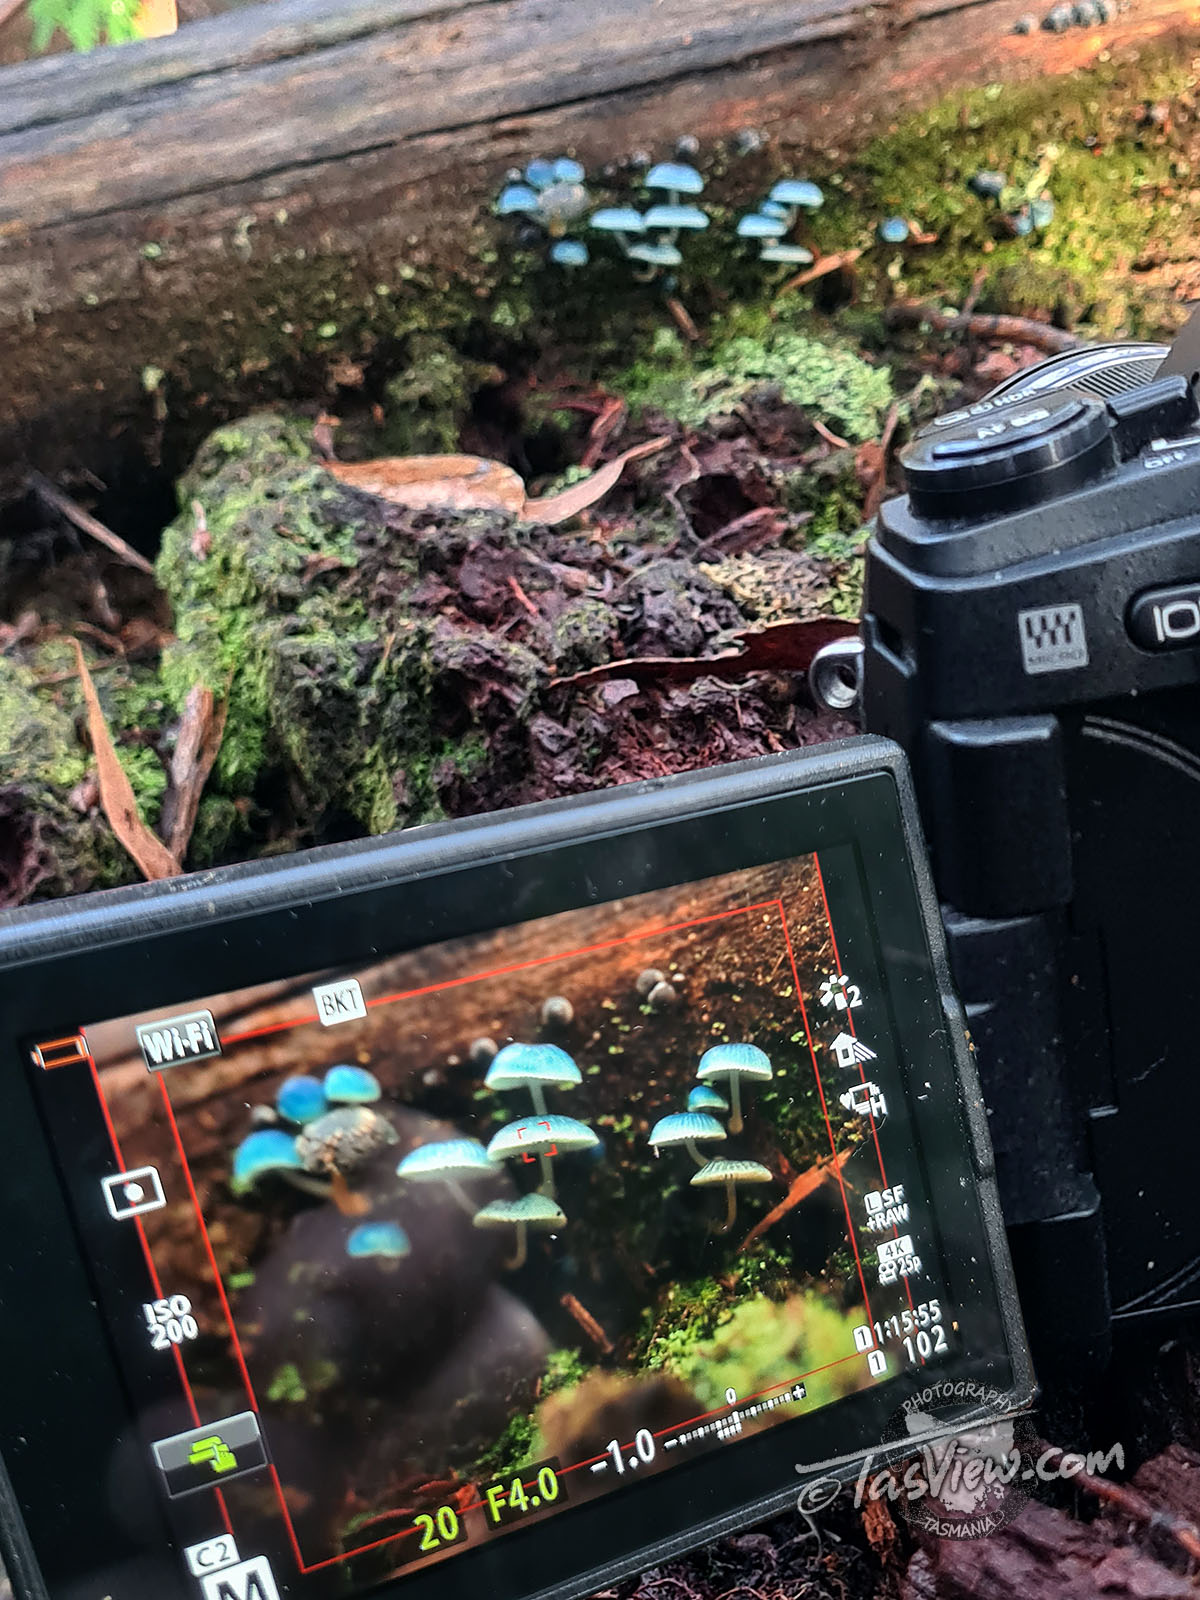
Technical crap for those interested:
Each single image of a stack is also saved as Jpeg and RAW in the camera. I picked out the best “in focus” RAW files from the first shot I took – which was deliberately under exposed about 2 stops – to stop the highlights blowing out and keep as much blue and highlight detail as I could capture.
I ran them though Adobe’s DNG converter so I could open each RAW file in photoshop and adjust them – (I have a preset I saved previously and only had to bring the shadows up more) – then I saved them as high quality Jpegs.
Next, to focus stack them in Photoshop: Files/scripts/Load files into Stack
then Edit/Auto-Align Layers, and Edit/Auto-Blend Layers.
Lastly, adjust levels, sharpen ( I like to use “Smart Sharpen” remove Gausian Blur about 30% @1.0 px, [depends on the image] then remove Lens Blur the same amount on the full size image.
I then save a completed BIG Max quality Jpeg before cropping, resizing to 72dpi, 1600w x 1200h, and another lens blur sharpen at around 15% before “saving as” the final jpeg for web (what you’re seeing) at quality 8 (high).
(Note: I use Adobe CS6.0 Extended – the last version you could buy outright).
Scroll back up and compare the three images. The last RAW one is a good compromise between the two and is worth the extra effort (though this is the first time I’ve bothered to do it) – less layers, so a little less is in focus but that also results in less ghosted edges. A lot more detail in the shadows and highlights than the first image, and less grain than the middle image (over did the vibrance) – I was able to punch the colour more (still a little too much) without losing detail.
Click to zoom and you will see the cobwebs.
If you want to get the best from your camera and photos, learning to edit from RAW files is a great skill well worth the effort. Below are my preset base settings I use for the EM1 II but they do vary depending on each image.

I love that this little cluster shows a wide variety of growth stages. Because it is fairly close to home – and a much easier walk than down to the Rivulet, I’ll try to get back up there every day or so to capture it’s evolution.

They are such dainty little umbrellas. Very pretty.
LikeLiked by 1 person
Thanks Anneli, it’s just stopped raining so will head up and have another look, irresistible!
LikeLiked by 1 person
Maybe if you get there at the right time you’ll catch the little fairies that are having a conference under these tiny blue umbrellas.
LikeLiked by 1 person
It’s funny the things I notice when editing, that I didn’t notice when I took the image 🙂
LikeLiked by 1 person
One of the beauties of photography – those surprises.
LikeLiked by 1 person
Lovely colours. Beautiful click. 👏👏
LikeLiked by 1 person
Thank you, I walked very close to these before I spotted them unexpectedly. A lovely surprise!
LikeLiked by 1 person
I never even knew blue mushrooms existed until I saw your blog. I like them so much I was inspired to include them in one of my illustrations. I’ll be posting it soon. 🙂
LikeLiked by 2 people
Thank you, I’m flattered! There’s another larger blue one here too with a golden colour in the middle at the top. I’ll try to dig out a photo I took a few years ago and post for you.
LikeLiked by 1 person
Super! 🙂
LikeLiked by 1 person
Wow!
LikeLiked by 1 person
Thanks 🙂
LikeLiked by 1 person