8th June, 2018
Last week I took the plunge on a DJI Mavic Air fly more combo. Against my usually strict preference for buying things outright only when I can afford them, I have decided to lease this drone instead. It was a long thought over decision but basically it means I pay around $300 extra per year (less than $1 per day) which gives me complete coverage of any accident, incident, failure, loss, theft and the like – I view it similar to the gamble of insurance in that it is covered for anything, even if it is completely my fault – hardware failure – or my dog eats it!

I’ve been hankering for the Mavic Air since it’s launch but after past experience of jumping in early, I decided to wait until it proved itself in users hands. It seems almost the perfect flying camera platform for me, capable of 4K video and 12MP RAW stills – all integrated and completely controllable from the ground with instant feedback while you fly. Being small and light weight at just 430g, it’s very unobtrusive and a nonthreatening drone to the casual bystander, though for it’s size, it does make some noise, but it’s not too bad. With the amount of tech crammed into this solid, quality built craft, it’s also one of the safest UAV’s on the market today. Though not fool-proof by any means, forward and rear obstacle avoidance and downward sensors and cameras help keep it safe from harms way.
It’s a bit gusty today so I’ve chosen not to fly, but it seemed to handle a fairly stiff breeze quite well for it’s size when at a safe location for testing and the wind alert popped up during flight.
So far, after reading manuals, watching videos and lurking about the helpful Mavic Pilots Forum, I’ve now depleted 11 batteries re-honing my flying skills and tweaking settings to fine tune this very promising aerial camera. Though I’ve kept it fairly close and set the maximum flight distance to 300m for now, Gotta say so far, I’m very impressed!!
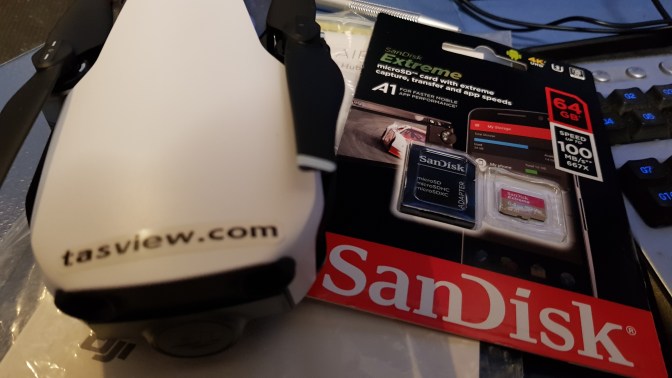
Only had some minor control sensitivity issues (personal preference really for filming) which I’ve resolved, but still have some video jutter mainly while panning which I hope to improve with some ND filters – a new 100MB/s mSD card helped too. You will need a high speed mSD card like the Sandisk Extreme A1 with speed up to 100MB/s. I first tried an older class 10 card but it seemed frames were missing even in 1080P, and this also happens along with artifacts introduced if you record to the 8MB of onboard memory, especially in 4K, so that can not be relied upon for filming.
One other minor annoyance for me is the location of the mSD card – it’s quite difficult to remove because it’s so recessed under the back cover. While you can plug a USB cord into the bird and download footage, the Air needs to be powered on to do this – after you’ve just emptied them flying around! I much prefer to remove the card and download directly to PC while recharging the batteries. To make it easier, I have put some tape on each card to create a tab so that it is easier to pull out – after pushing in to release it.
The controller is smaller in my hands than I’m used to – but this kit’s overall compactness and convenience for travel means it’s something I’ll gladly get used to. It’s fairly comfortable to hold for the flight duration and all the buttons are easily accessible. It would be nice if the gimbal tilt wheel was a bit firmer.
It’s the quickest UAV I’ve ever seen to unpack, set up and get flying! The trickiest part is plugging the controllers USB cord into your phone which is usually no drama.
Flight time in real-life conditions is safely around 15-16 minutes. Though if pushed it will fly a little longer, I always like to land with some juice still in the batteries! It will make them last longer too.
Though the black Air looks really cool, I chose the Arctic White version and so glad I did. It’s quite easy to see against the blue sky as it’s underbelly is black anyway, but for it’s size, it’s also not too bad when you get a hill behind it. I find the white “legs” at the front where the video antenna’s are located provide an easy reference for craft orientation even over 200m away. I find them easier to see than the LED’s on the front arms, though the LED at the back is nice and bright – especially when flashing red with a low battery.
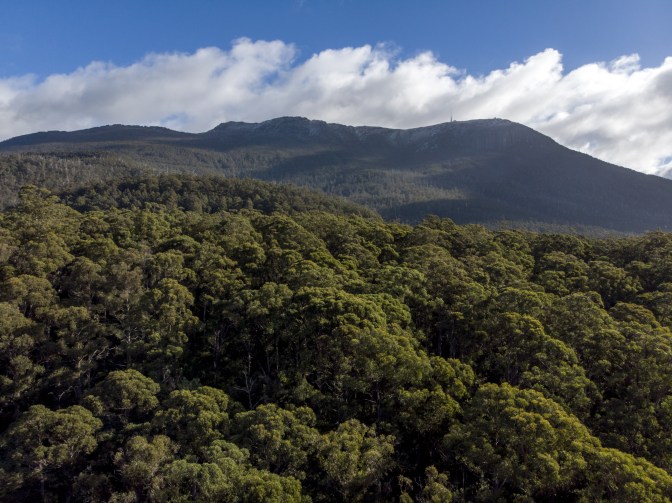
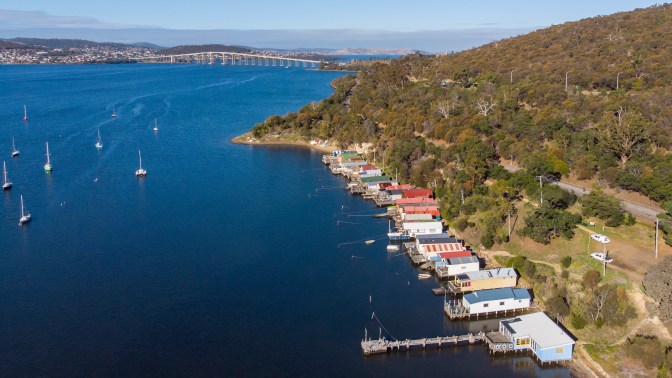
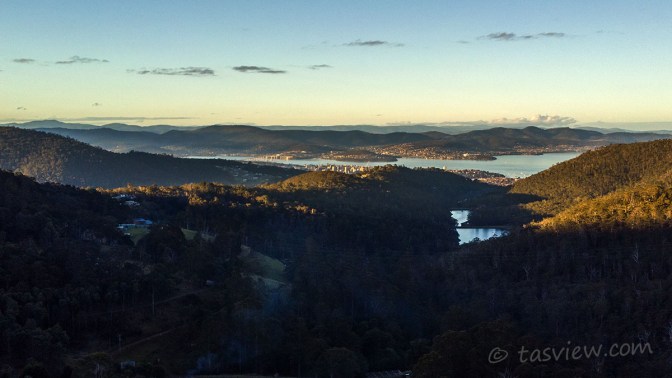
Now, my main intended use for the Air is a flying aerial camera for slow, smooth video and quality stills to capture a different view on the magical places I like to visit – especially around Tasmania. I’ve dialed the controls down nicely to a point where I’ve now very happy with them (my settings are at the end of this post). HOWEVER … flick a little switch on the controller into sport mode and instantly this thing becomes another beast altogether!! Aggressive attitude has it zipping about the sky at great speed and is so much fun – BUT, be warned, in this mode, the anti-collision sensors are disabled! Though I initially thought I wouldn’t use this mode much, it’s great if you want or need to move your bird quickly – to a new shooting location or more importantly – say you’re at 400′ and you suddenly hear an aircraft come over a close by hill at low altitude, flick it into sport mode and it instantly drops much faster than anything I’ve flown – oddly making it safer.
A letdown of the DJI go4 app is the inability to select ATTI mode (no GPS) before flight. It would be handy in tight places or valleys where you can’t get GPS on take-off, but it might kick in during flight, possibly making the craft erratic and unpredictable while also not knowing it’s home point! This is a major cause of fly-aways. It’s also good to practice in ATTI mode so you know what to expect if you ever lose GPS.
You also can’t set waypoints for aerial mapping.
I’ve already bought a few accessories including PGYTECH landing pad, controller lanyard and a set of 4x combined ND/PL Pro filters for the camera lens. I’m initially impressed with the apparent quality – but time and testing will tell. I also made a simple glare guard for my mobile phone which also has my Pre-flight checklist conveniently printed on the inside. Here it is below, though I’m still working on it’s refinement to suit my purposes.
PRE-FLIGHT CHECK – tasview.com
Home: Charge Batteries 1hr, remote – 2.5h
Check area – use “can I fly here” app.
Check weather, sun location
Prepare flight plan – Download offline maps in App
Connect & check for app/ firmware updates
Check camera settings, controller settings ###
check – props, motors, gimble, clean lens, SENSORS, filters, body
Pre-Launch:
Check flight plan, area & flight path clear- check obstacles.
Mobile – check “can I fly here”, close apps, restart, silent mode
Drone – back arms down, front arms out, antenna’s/front legs down.
CHECK MSD Card, REMOVE GIMBAL COVER, check gimbal
check battery locks, props and motors, camera and sensors clean.
Power on – press, hold, place in clear level area, nose pointing away
Controller – fold out mobile grips
screw in control sticks, unfold antennas
Power on – press, hold
Mobile – Plug in cord, mount mobile & glare guard
– launch DJIgo4, Pair Mavic with controller
Check camera settings/filters for conditions
Check status, ORIENTATION & SET HOMEPOINT
Wait for and check GPS lock – ideally at least 10 satellites before launch.
CHECK AREA and flight path – look and listen.
!!! PRESS RECORD !!!
Sticks down & together – throttle up to 7m, hover,
check stable, check app, check stick response
Stick to flight plan!! Smooth and slow.
foreground, heights, angles, light – video,- Modes?###
stills, HOVER – HDR, EV+-, , pano, ###
While you can use the flight check above, I take no responsibility for errors, it works for me but maybe not for you! There is no substitute for reading the manuals to get a full understanding of your craft and it’s operation before flight and creating your own checklist.
Mavic Air Settings – tasview.com
I am of the opinion that every Mavic Air is not exactly the same with small variations in production, especially the camera. Likewise, every operator will have their own preference based on themselves and their flying style. Below are the general setting I use which may be a good starting point for you – but play around and use what suits YOU!
SETTINGS:
MC Settings –
RTH Altitude: 30m
Max Altitude: 120m
Max Flight distance: 300m
/Advanced Settings:
EXP: Throttle: 0.16, Rotate: 0.12, FBLR: 0.16
/Sensitivity:
Attitude: 90, Brake: 80, Yaw Endpoint: 30
/Gain:
Pitch: 100, Roll: 100, Yaw: 80, Vertical: 100
Cinematic mode Gain: 10, Yaw Sensitivity: 150
RC Signal Lost: RTH
Visual navigation Settings: generally all on except TapFly
Aircraft Battery: Low warning 30%
Gimbal Settings:
/Mode: Follow
/Camera Gimbal Advanced Settings:
Max Gimbal Pitch speed: 4
Gimbal Pitch smoothness: 22
Extend Gimbal Tilt Limit: on
General Settings:
Cache Locally When Recording: on
Record Audio with Video Cache: on
Cache to SD Card: on
Largest Video Cache: 10G
Adaptively Reduce Cache Resolution: off
Auto Video Cache Cleanup: on
Unlocking Licence: ??????
CAMERA STILL SETTINGS (Using ND filters to adjust for exposure).
Aperture icon:
/Manual, ISO 100, /Shutter 100
Camera icon:
/Photo: Use Single shot, HDR, AEB (Auto Exposure Bracketing) x5
/Image Ratio: 4:3 (Allows for cropping)
/Image Format: JPG+RAW
/White Balance: Select Sunny or Cloudy or create custom
/Style: Custom Sharpness +0, Contrast -3, Saturation -2
/Color: None
Gear Icon:
/Histogram: on
/Video Captions: off
/Over Exposure Warning: on
/Grid: Grid + Diaganals
/Smart LEDs Off: on, Rear auto off: off, Head LEDs Auto Off: on
/File Index Mode: Continuous
/Save Unstitched Pano Photos: on
/Storage Location: SD Card
CAMERA VIDEO SETTINGS (Using ND filters to adjust for exposure).
Aperture icon:
/Manual, ISO 100, Shutter 120
Video Cam icon:
/Video Size: 1080p/60fps (generally)
/Video Format: MP4
/White Balance: Select Sunny or Cloudy or create custom
/Style: Custom Sharpness +0, Contrast -3, Saturation -2
/Color: D-Cinelike
Gear Icon: same as Still Settings
______________________________________________________________
Anyway, for what it’s worth, that’s a quick introduction on my first impressions and limited experience with the Mavic Air. There’s plenty of youtube video’s already on the Air without me needing to go into too much detail for now. I’ll add some links later to some that I found most useful. If there’s anything you want to know or want me to check out, let be know in the comments below. I will update this page as I learn more.
Also, it’s well worth joining the helpful Mavic Pilots Forum, to keep up to date with the latest issues and tips – a seemingly friendly and helpful bunch of fellow drone users.
BEST FORUM TIP found so far: Check app orientation pointer is correct before lift off! (Something NOT in the manual that’s a must do and has caused a few crashes!!)
My tip: don’t forget to hit record!
Stay safe & happy flying,
Tone.
_____________________________________________________
