9th January, 2016
After about 100 trouble free flights, I haven’t flown my F550 for a few months now. The final parts that I ordered back in November for my UAV arrived this week, so I’ve been busy almost completely rebuilding it into a Y6 Tricopter.
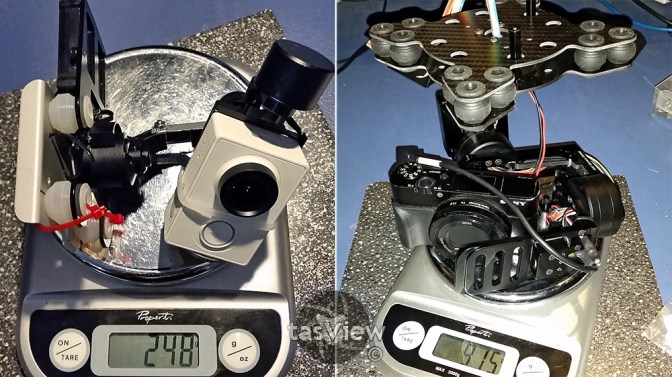
The reason, I wish to carry a much better – and heavier camera, the Sony RX100M3 which I bought back in October and a G40 gimbal which means I need to trim as much weight elsewhere from the craft as possible. I plan on rebuilding and modifying some parts of the new gimbal to make it lighter also.

The original F550 kit which I built was a Hexacopter – it has 6 plastic arms with a single motor on each.

I’ve been busy installing new lighter weight “Aimdroix” extended aluminium arms, but instead of six arms, I’ve reduced it to three, with a motor mounted top and bottom of each. This configuration is called a Y6 Tricopter.

The internal electronics for the old HEX setup had been added to over time and became, well, a little untidy.
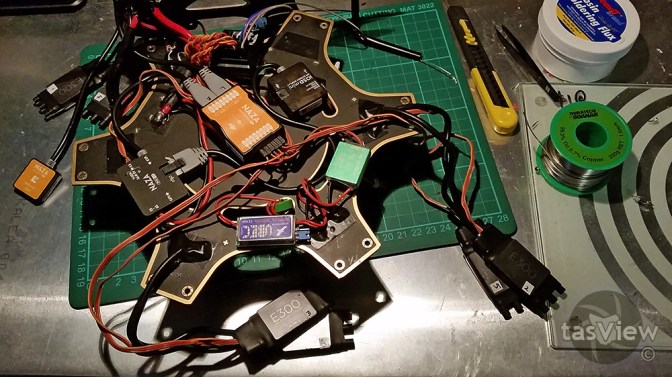
As I had to resolder the E300 ESC’s (Electronic Speed Controllers) to pair them up for the new configuration, I also changed the layout, tidied things up and reduced as much weight as I could, almost rebuilding it completely.

This has resulted in a much lighter craft around 1kg as seen here, which should be more stable in wind and also more agile, allowing me to carry the heavier camera setup and retain flight times of around 15 minutes with an all up weight around 2kg.
I have ordered some larger propellers which should improve efficiency and hopefully increase flights to 18-20 mins – or allow me to put a smaller, lighter battery to trim weight further.
I still have the camera (HDMI-AVI, VTX and Gentles gentWIRE_MULTI controller) and G40 gimbal wiring (and eventual weight reduction modding) to finish off and figure out the best way to attach it – along with some legs.
It did cross my mind to trim the centre plates down the track, or make or order some plates like this http://www.getfpv.com/pro-tricopter-power-distribution…
I have power distro in my current bottom plate which may cause issues trimming.
Because the new camera/gimbal are much heavier, instead of having it mounted forward and balanced with the battery underneath as previous, I’ll likely mount it closer to center and put the battery at the back on top to reduce any potential pendulum effect caused by too much weight low down under props.
10th January, 2016
Don’t you love it when you suddenly have an epiphany! I was rebuilding a PC which was giving me some grief (surprise, Windows 10), when I had an idea for the legs. Within minutes, well, maybe a bit longer, I had the legs on the Tricopter sorted, and then mounting the gimbal just fell into place like it was meant to be! I’ve also tested placing the battery on the top plate and it balances beautifully. Like the A-Team, I love it when a plan comes together 🙂

Now, back to that damn PC. I still have the camera and gimbal wiring to complete before we get airborne, but it won’t be long now 😀
21st January, 2016
F550 Y6 Tricopter with Sony RX100 III
The craft is now fully complete, everything works and is ready to fly when some new props arrive. I changed the legs again from the previous post saving 65g and making them much more stable. I used Carbon arrow shafts and made some lightweight feet using ExpandaFoam. Many people go for retractable legs. While they look good, they are heavy and something else that can fail. I’m building my craft for function. I’m more interested in what the images I capture look like, not what the craft looks like.
27 January, 2016

I’ve drawn a complete wiring diagram of my new Tricopter. You can access an easier to read PDF version HERE. Hopefully the diagram above might help someone out using similar components but I also did it for my own reference.
I use a Devo F12E controller / transmitter with built in LED FPV screen.
On the 5.8GHz video side it is paired to a lightweight FT952 200mW video transmitter via a 5.8 GHz Circular Polarized Antenna Set. The Sony RX100 M3 HDMI out runs through a HDMI to AV RG03916 video converter, then through the iOSD Mini to the video transmitter, sending a live video feed to the F12E with telemetry data from the craft including battery voltage, GPS information, height, distance, direction etc.
On the 2.4GHz band, the F12E is paired to a Devention Devo RX1002 ten channel Reciever. This is wired up to a DJI NAZA M V2 flight controller system with GPS running the standard DJI E300 ESCs (Electronic Speed Controllers) and motors (I will be experimenting with propellor sizes, but will likely use 1045 props).
The camera is controlled remotely using a gentWIRE-MULTI with multiLED status indicator. Currently I’m only using the video/photo switch control but will likely add remote zoom control by replacing the Trim Gain on AUX1 once the craft is tuned in.
The RX100 camera is balanced on an iFlight G40 3 axis gimbal with Alexmos 32 bit controller. The gimbal roll (moving the camera angle up or down) and gimbal pitch (to get the horizon level) is controlled remotely by the operator on the F12E.
While the overall diagram may look overwhelming to some initially, once you break it down into it’s smaller components and sections it becomes easier to understand and build the craft. The main skill required is soldering. And patience – lots of it.
Still waiting on my props before I can test fly.
February 16, 2016
Last week a set of props finally arrived. After several successful trials, it had a massive flip. Despite the very heavy landing – luckily upside down – the only damage was 4 broken props, a few busted cable ties and my pride.
Despite being due to nothing I did at the controller, I think it may have in part been due to an earlier takeoff rollover possibly damaging a prop – which I think was caused by my placement of the GPS. So I’m calling it a pilot error, though I didn’t crash it directly.
It has since been suggested that the props may have been overtightened causing one to explode in flight.
Here’s a video of testflight highlights and the flip:
Please read the video description for further information.
A lesson or two learnt.
This gave me the chance to reconsider how I had setup the craft and has resulted in some changes. There’s also a few ideas mentioned here I was using previously.
 Between the plates I removed the 3.5v bec and power the Gentwire from the RX1002 3.5v output – less weight.

I added carbon tube (arrow) spacers to provide more rigidity to the plates. You can see above how I have the G40 gimbal posts mounted directly to the bottom plate – there’s one with a white plastic washer infront of the flight controller – no holes had to be drilled.
The shortened GPS stand is now more central and mounted with plastic screws – a deliberate weak point so they break rather than the antenna. they’re also much lighter.
The GPS location was also changed with the NAZA Assistant software.
Note the loose red cabletie on the gimbal damper, used as a retainer.
The LED bike lights on two arms are temporary.

At left, a single carbon tube spacer is cabletied on the sides between the plates.
You can see how my 7g carbon fibre arrow leg is mounted with cableties onto the arm. In the crash, the cable ties were the week point and no damage was done. I have them stabilised with fishing line – light weight and very strong, works a treat.
I’ve used a cut bendy straw to mount my antenna at 90 degrees.
Though the cables on the back of the gimbal look untidy, they helped soak up some inertia in the crash, possibly saving some damage. All of them were disconnected and two wires were stripped out of their connectors.

The Naza status LED mounted with cableties on the tail on the Aimdroix motor mount.
I may move these to the top of the arms yet, however the props don’t seem to get in the shot. It is better in relation to centre of gravity to have them mounted below.

Ready for further testing … when more props arrive …

2 thoughts on “F550 Y6 Tri – RX100 III”