This post is about all my current camera kit – what works, what hasn’t. It’s not neccesarily THE BE$T, but I think it represents great BANG FOR BUCK! If your getting into photography, this might save you some time and money learning from my mistakes.
Firstly, CAMERA BAGS.
I’ve tried quite a few over the years, below are my previous two, both purchased on sale. The problem with both of these bags: all the weight is on one shoulder, which is fine for short periods, but if you bushwalk or need to carry it for an hour or more, you begin to suffer.

I used the Lowepro Nova 170 AW on the right for about a year, great bag. Well made, good layout and design with little storage pockets for filters, memory cards, batteries etc, good size for the gear I have but no extra room for anything else. Swings around your body when things get rough, though it does have a loop for your belt to pass through but I never used that – too hard to get off when needed.
The Vanguard cross-body sling sat better against my body, but still twisted me about with uneven weight on long hauls. I’ve had this bag for a few years and modified this one. It had no good storage for the small things mentioned above, I built a foam insert to protect my gear better and added some external straps to carry tripod and jumper/coat.
Earlier this year, I began the hunt for my almost perfect bag at a reasonable price. Is there such a thing?

I was after a backpack and it had to be light! Most of the one’s I liked were over 1.2kg. I wanted it a bit bigger with two separate compartments – to accommodate a drink, snacks, hold a tripod and maybe fit a coat or jumper, but not too big. I wanted one with a side door for quick camera access and hopefully waterproof.

I eventually settled for this one from TomTop which met all my requirements for $37 AU. Weighs around 600g, waterproof, and can hold a laptop too – which I use to carry a foam kneeling pad in – as seen in yellow.

I’ve been using this bag for about two months now, it is fully padded and configurable with inserts, fits everything – and more, there’s still room for another lens or two! However, it lacks separate pouches for those small things .. but there is a mesh compartment inside the back flap.
The zips seem good quality, material has held up to a quick creek dunking already and mud cleans of easily. It’s comfortable to wear – 12km hike no problem, my only negative comment would be that the padding is not very stiff so the bag isn’t overly rigid – but the stiff foam kneeling pad down the back helps with that.
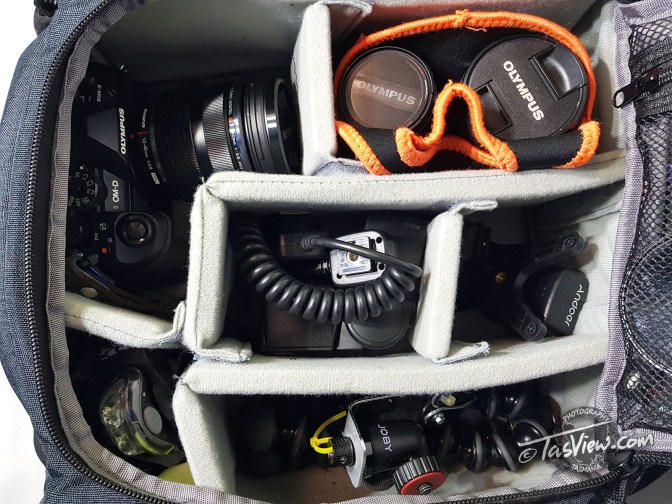
So … WHAT’S IN THE BAG?

Filters – you really only need two in your kit – Circular Polarising for water/sky and a Variable Neutral Density filter. Most other effects can be done in post-processing. Tip – save money and buy only one of each that fits the largest diameter lens and use step down adaptors for the other lenses!
Spare memory card and battery (not shown, it’s on the charger), bubble level cover for flash hot-shoe (not essential as the Oly has a built in level).
Lenses – M.ZUIKO DIGITAL ED 14-150mm F4.0-5.6 II (58mm dia filters)
Non-pro but weather-sealed lightweight all-rounder lives on my camera. Sweet spot for sharpness is f/6.3 – new on sale with EM5 II.
M.ZUIKO DIGITAL ED 12-40mm F2.8 PRO (62mm dia filters)
Pro lens offers sharper image quality, sweet spot f/4.5 – used.
M.ZUIKO DIGITAL ED 60mm F2.8 Macro (46mm dia filters)
Pro lens great for portraits and fixed landscape, sharpest at f/4 – used.
[Next lens likely Laowa 7.5mm f2.0, for astro, around $750 ebay]
I keep my lenses separated in a neoprene carrier to protect them from knock and makes them easier to handle – which is actually a cut down beer can holder I bought … used.

Camera – Olympus E-M1 Mark II – used. I honestly see no compelling reason for me to upgrade to the recently released Mark III, I love this camera!
Flash – Andoer remote wireless trigger (x2), Olympus FL-36 Electronic Flash and hotshoe capble – all bought used. LED head-torch – with white LED’s for extra lighting and RED LED’s for night shooting! (plus a spare torch on my shoulder strap).
Tripods – home-made low bracket for macro, Joby Gorilla-Pod, Manfrotto BeFree – used (before this I used cheap and lightweight ones – not as stable, get the best one you can afford). I’ve also used rocks and sticks to rest my camera on, a small bean bag is also a good suggestion.
Lens cloth and rag. Tip: ALWAYS make sure your lens is clean! The rag is for hands and camera cleaning and good to wrap gear in if it gets dirty so your bag doesn’t.
I also carry water, snacks, hat, gloves, sun glasses etc. in the top compartment.

I don’t like camera neck straps, so I made this leather wrist strap. the blue bit is a piece of plastic ice-cream container for extra strength and to help save the leather from wearing. I used a rubber plumbing O-ring as an adjustable keeper. It works great and has saved a drop!!
All up, the full kit weighs 5.1kg or 3.5kg without the Manfroto BeFree tripod.
When I shot with Nikon, I carried around 8kg of gear!
Lastly, here’s my simple studio set-up where I took these images.
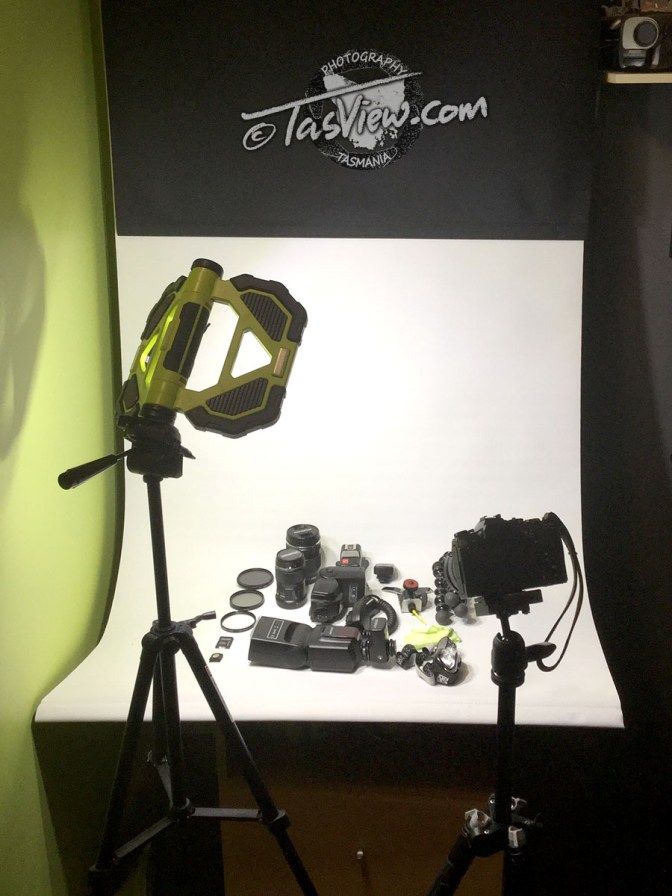
Originally I used white core-flute as a little studio for product pics, then I tried a few things that failed: first idea was green-screen painted wall – but you end up with green shadows and light reflections. I then tried hanging black and white sheets but they’re not smooth enough and you end up with shadows. Finally, I waited until blinds were half price! I have a black one and a white one mounted on my ceiling, these are prefect for a smooth background. Now I need to repaint that green wall white!
Usually instead of flashes, I find it easier to use the LED work-light mounted on an old tripod. I have an umbrella that is silver on the inside that I can use to bounce softer light too if needed and other spot LED’s if required.
Feel free to comment, ask question, offer tips on my gear or what YOU find useful in the field or studio, especially on a budget!

I love do it yourself camera gear! I can’t justify, let alone afford the cool retail bling. Makes so much more sense to built it yourself. It can’t be hard if I can do it. I love the roller blind idea. Much better than black and white craft board. Thank you!
LikeLiked by 1 person
No problem, thanks for your comment, I’m glad someone found it useful 🙂 My old man taught me to never pay full price for anything .. the internet is great for finding bargains!
LikeLike